
1. Introduction
Like many committed Star Citizen backers, and with the aim of increased immersion, I’ve gradually made the transition from keyboard and mouse to dual sticks (HOSAS) to HOSAS plus pedals. In the process of doing so, I’ve made extensive use of the excellent guides and Star Citizen keybinding Control Profiles provided by such people as BuzZzKiller and, more recently, Johnathan Winters who provided the inspiration for adding pedals to my HOSAS setup. Credit to both for imparting their knowledge of the intricacies of keybindings and multi-input setups in Star Citizen. I would also like to thank RedLir in particular for his Joystick Gremlin videos which have proved invaluable. This guide could not have been written without watching the videos and articles which these individuals, and others, have posted on YouTube.I have written this guide as a source document for Cornerstone members, or anyone else for that matter, who wants to take more control of their keybindings and avoid the oft-times frustrating area of game configuration.
I don’t yet have a throttle, but this article could equally be adapted to a HOSAS setup which also includes a throttle, or a HOSAT configuration. Although written for Virpil Constellation Alpha sticks, the principles are also equally applicable to other joystick manufacturers (although this hasn’t been tested!).
2. The Problem
Configuring multiple input devices to run with Star Citizen, particularly ones which are similar such as matched left and right hand joysticks, can be frustrating and problematic with time spent on configuration within the Star Citizen UI often lost for no apparent reason, or due to the vagaries of Windows device assignment.Multiple input devices, each with a significant number of axes, axis curves, hat switches and/or buttons (plus modifiers) can present an initially daunting challenge for individual configuration. Although rare, it is not unknown for some players to have given up with the game entirely on losing their key-bindings or being faced with hours of re-configuration post patch.
3. The Solution
Simply put, the creation of one or more virtual devices, which sit outside of the Star Citizen Control Profile interface, allow for multiple input methods (sticks, pedals, throttles etc.) to be created and saved independent of the game, and any limitations imposed by Windows itself. The benefits of such a construct include:- Reduces the number of keybindings which need to be configured in the SC Joystick/HOSAS Control Profile.
- Occasionally, when importing Control Profiles, some keybindings will not bind properly. Having as many bindings as possible configured in the virtual joystick, will reduce the number of such errors, and the need to check for them post-patch.
- Avoids any Windows Device ID issues.
- Due to the way in which Windows handles USB devices, there is no guarantee that two similar devices (such as twin joysticks) will be recognised the same way each time that the PC reboots, or when devices are reconnected. Your left hand stick, for instance, may have a Device ID of 1 for one session and 2 on the next even though you have not made any configuration changes and plugged them into the same USB port.
- Whilst the Star Citizen Console does provide a command to overcome this and switch Device IDs (pp_resortdevices joystick 1 2) this could introduce confusion.
- vJoy
- Joystick Gremlin
- HidHide
3.1 vJoy
Allows keyboard input to be translated to joystick input through the creation of one or more virtual joysticks. Typically, these virtual sticks will have more axes and buttons than a standard (physical) stick to allow mapping of multiple input devices to one or more virtual devices.3.2 Joystick Gremlin
A program that enables the configuration of joysticks, throttles, and pedals independent of manufacturer. Avoids the requirement to use manufacturer specific software such as Thrustmaster T.A.R.G.E.T. or CH Control Manager. Joystick Gremlin uses the virtual joysticks provided by vJoy to map physical to virtual inputs. It also allows for other transformations such as response curves and provides macro functionality outside of the game.Once installed, ensure that Joystick Gremlin is set to Run as Administrator. Not having this set may result in Star Citizen refusing to accept any of the Map to Keyboard bindings which you set up later in JoyStick Gremlin
3.3 HidHide
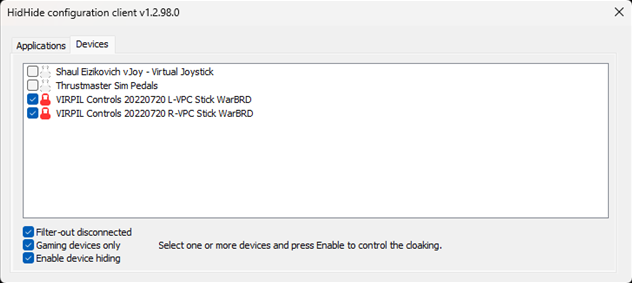
Acts as a filter or cloak, effectively hiding your devices from Star Citizen and any other programme which you specify. This latter point is important to note. Once HidHide has been configured to hide an input device (physical or virtual) that device is effectively hidden from any software unless you specifically configure it otherwise. So, if you have Virpil sticks then you should add any of the Virpil applications (such as VPC Configurator) to the Application exclusion list as shown below:
The same applies to any other programmes (such as DCS) which might use the sticks. Just click the ‘+’ on the Configuration Client, navigate to where the .exe file for the programme you wish to exclude and then click Open. The programme will then be added to the exclusion list.
HidHide is not (currently) affected by EasyAntiCheat.
4. INSTALLATION
It’s important that the following is adhered to, or you may experience issues later during the configuration process. You should only need to do this once:- Unplug any USB connected input devices apart from Keyboard and Mouse.
- Install the latest vJoy release.
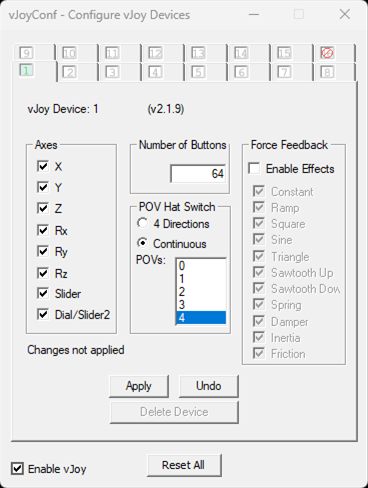
- Run Configure vJoy from the Start or Search menus
- Ensure that vJoy Device: 1 is shown at the first tab.
- Select all Axes.
- Set Number of Buttons to 64.
- Disable Force Feedback by deselecting the Enable Effects box.
- Set POV Hat Switch to Continuous and POVs to 4.
- Check to make sure that Enable vJoy is selected in the bottom left hand corner.
- Hit Apply.

- Install the latest HidHide release.
- Reboot your PC.
- Install the latest Joystick Gremlin release.
- Reconnect your USB input devices.
- Run HidHide Configuration
- As mentioned earlier, under the Device tab ensure that the input devices you wish to hide are selected (the earlier example has Thrustmaster Sim Pedals shown as not selected - if you wish to hide this then select the check box to the left of the device).
- Ensure that Shaul Eizikovich vJoy - Virtual Joystick is unselected.
- Select Enable Device Hiding at the bottom left of the Devices tab.
- Add any applications that you wish to exclude from HidHide on the Applications tab by clicking the ‘+’ button to the bottom right of that tab. Ensure that the Joystick Gremlin .exe file is included in this list.
- Close the HidHide application by clicking the top right of the window.
- HidHide will now be running in the background at all times. You can add any additional exclusions by running the configuration again. You can also disable HidHide by simply unchecking the Enable Device Hiding box.
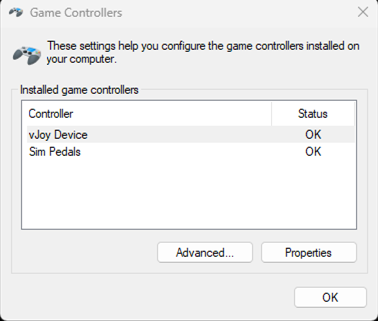
- Test whether HidHide is working correctly by running Set up USB Game Controllers from the Windows Start menu. You should see the vJoy device and any other device which you haven’t selected (in the example shown below, and the second HidHide Configuration screenshot in 3.3 above, the Sim Pedals have not been selected which is why they appear in the Game Controller interface window). All other devices should not be shown.

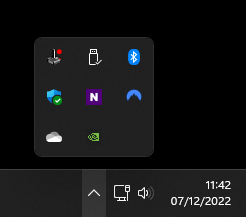
At this point, it’s worth checking that things have been configured correctly by running Joystick Gremlin, clicking the icon in the system tray (top left in the image below)…
...and checking that you have a tab for each device and additional tabs for Keyboard, vJoy Device #1, Settings, and Plugins.

Now that all the groundwork has been done, it’s time to start configuring Joystick Gremlin. You can choose to do this incrementally, testing in game as you go (my preference), or complete the configuration in one go then test.
It’s worth making your own keybinding chart/graphic at this point, or taking notes as you go. For Virpil Alpha owners, one of the best configuration charts I’ve come across are those provided by BuzZzKiller which can be found here. BuzZzKiller even provides templates.
5. CONFIGURATION
5.1 Configuration Principles
There are a number of aims here:- Reduce, as far as practicable, any changes to the default Star Citizen Control Profile.
- Use default SC keyboard and mouse bindings where possible, mapping these to joystick and throttle inputs in Joystick Gremlin rather than in the SC Control Profile.
- Keep any axis curve modifications outside of the SC Control Profile.
When making bindings in JoyStick Gremlin, it’s worth having the Input Viewer open (Tools > Input Viewer) and selecting Axes - Current and Buttons + Hats for your physical devices and the virtual device(s) you’ve created. This allows you to see which inputs are being addressed and how they have been mapped to the virtual device.
5.2 Axes
Typically, it’s worth beginning with the six axes of movement which you want to configure:- Pitch
- Yaw
- Roll
- Strafe Up/Down
- Strafe Left/Right
- Throttle Fwd/Back
- Left Stick:
- Strafe Up/Down
- Strafe Left/Right
- Roll
- Right Stick:
- Pitch
- Yaw
- Pedals:
- Throttle Fwd/Back
- Space Brake
Moving from HOSAS to HOSAS with pedals and swapping out the Throttle Fwd/Back from the left stick to pedals, does initially take some getting used to but the improvement in control is significant and worth the effort.Looking at each of the stick/pedal configurations in turn.
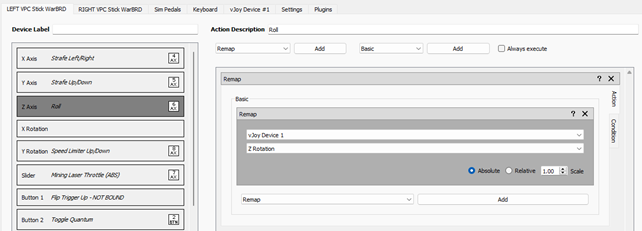
5.2.1 Axes - Left Stick
- Open Joystick Gremlin and select the tab titled LEFT VPC Stick WarBRD.
- Click on X Axis in the left hand pane.
- Type Strafe Left/Right into the Action Description, select Remap from the drop-down menu and click Add.
- Ensure vJoy Device 1 is selected in the grey Remap window and select X Rotation from the drop-down dialogue immediately below it.

- Select File > Save Profile (at this point you may be asked to name the file).
- Do the same process for Strafe Up/Down and Roll, selecting Y Rotation and Z Rotation respectively.
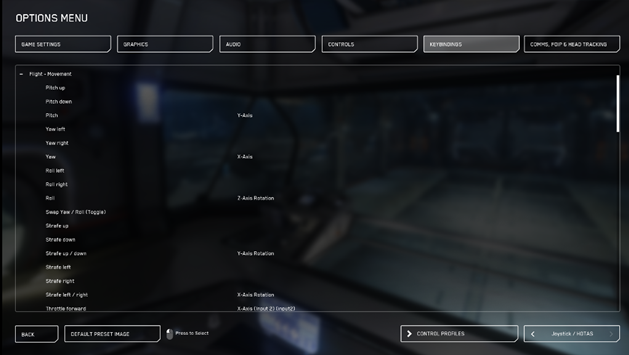
- Launch Star Citizen and navigate to the Advanced Control Customisation under the Options menu.
- Ensure Joystick/HOTAS is selected in the bottom right hand corner and expand the Flight - Movement.
- Now bind the 3x axes you have just saved in Joystick Gremlin, against Roll, Strafe Up/Down and Strafe Left/Right by moving the respective left joystick axes. Once bound, your profile should look something like this:

5.2.2 Axes - Right Stick
- With Joystick Gremlin still open, select the RIGHT VPC Stick WarBRD tab and bind Yaw to the X Axis and Pitch to the Y Axis.
- Make sure that you select X Axis and Y Axis from the drop-down menus in each Remap mapping.
Note - it’s entirely possible to have configured the left stick axes to X, Y and Z Axis within Joystick Gremlin and the right stick axes to X Rotation and Y Rotation.
- Bind the axes within Star Citizen as before.
- At this point you have 5 of the 6 axes configured within JoyStick Gremlin and bound to a profile within Star Citizen.
5.2.3 Sim Pedals
My Thrustmaster Sim pedals have 3x pedals which appear in Joystick Gremlin as follows: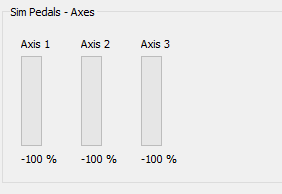
Pedals 1 to 3 are Left, Right and Middle respectively.
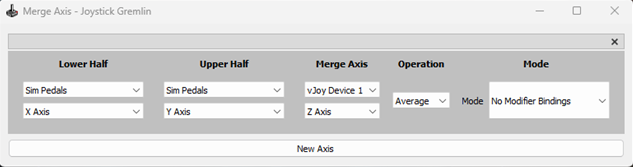
- In order to combine Axis 1 and 2 into a single axis (in my case Throttle Fwd/Back) it’s necessary to use the Actions > Merge Axis command in the Joystick Gremlin drop-down menu. This opens a small window which needs to be expanded by dragging a corner and then configuring the axes as follows:

This forces Axis 1 and 2 on the Sim Pedals to a virtual axis (the Z-Axis on vJoy Device 1 in this case). In the Operation drop-down dialogue, select Average if both axes are zero or 100% at rest. - Once again, launch Star Citizen and navigate to Advanced Control Customisation under the Options menu.
- Ensure Joystick/HOTAS is selected in the bottom right hand corner and expand the Flight - Movement.
- Bind the Z Axis to Throttle Fwd/Back by pressing the respective Sim Pedal axes.
The Z axis can also be set to move forward and back when on foot. Simply navigate to Advanced Control Customization as before, expand On Foot - All and bind Move Forward / Backward to the Z-Axis.
5.2.4 Axis Check
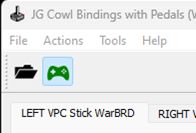
The quickest way to check that any bindings which you’ve made have been successfully bound in Joystick Gremlin and Star Citizen is to launch Arena Commander, choose a Single Player game, jump into a ship and test.Before doing so, ensure that the small gamepad icon in the top left hand corner of Joystick Gremlin is green; this indicates that the profile which you’ve created is active.
One of the real benefits to JoyStick Gremlin is that you can make changes to the keybinding profile on the fly as it were, simply by reconfiguring bindings in Joystick Gremlin, saving the profile and reactivating it. This can be done whilst Star Citizen is running and makes the process of checking that bindings have been set up correctly that much easier.Once you’re comfortable that the flight axes have been set up as you want them to be in Joystick Gremlin and Star Citizen, it’s time to move on to keybindings.
Deselecting the gamepad icon, saving the profile, then reselecting the gamepad icon, is a good habit to get into early.
6. Keybindings
As mentioned earlier, one of the key principles when configuring Joystick Grelim is to make maximum use of the default Star Citizen keyboard and mouse bindings and reduce the number of custom bindings which need to be saved in the Star Citizen user profile. I don’t propose to go through every keybinding which I made, but the following examples should serve to explain how to configure things for most of the Virpil Alpha input methods (hat switch, multi-stage trigger, scroll wheel etc.) plus the use of a modifier button.6.1 Mapping Keyboard to Stick
In Star Citizen, Toggle VTOL is bound to the ‘K’ key.On my Left Virpil Alpha, I prefer to have this command bound to Button 12.
To create this association in Joystick Gremlin, do the following:
- Ensure the GamePad icon, at the top left of the JG application, is not active.
- Select the LEFT VPC Stick WarBRD tab.
- Select Button 12.
- In the Action Description box, type ‘Toggle VTOL’.
- Select the Map to Keyboard action and click Add.
- Click Record keys and press the K key.
- Select File > Save Profile.
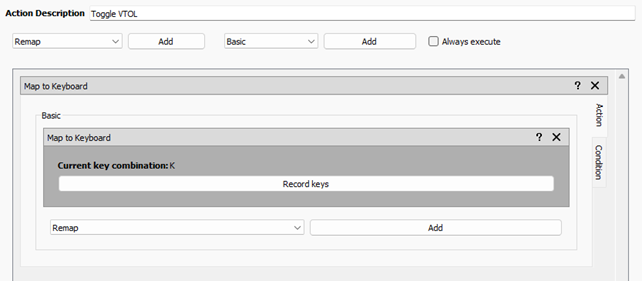
Toggle VTOL is now bound to your Left Virpil Button 12.
Note that there is no need to replicate this binding (or any others which are based on the default keyboard and mouse configuration in Star Citizen) within the Star Citizen profile itself - the keybinding will be active so long as your Joystick Gremlin profile is also active.
6.2 Mapping Modifier Inputs to Stick
In Star Citizen, Deploy Landing Gear is bound to the ‘N’ key.On my Left Virpil Alpha, I prefer to have this action also bound to Button 12, but only when a modifier key is pressed simultaneously.
In order to create this association, it’s first necessary to decide how modifiers will work in Joystick Gremlin and then configure a specific key to do so. Joystick Gremlin provides a couple of ways to set up modifiers. Having read into it, I found that the most straightforward way to configure this was by use of the Mode function. Modes are self-contained configurations which can be associated to a parent (which forces the mode to inherit all bindings defined in the parent) or established to act independently (no inherited bindings).
I created two modes for my Joystick Gremlin profile. Selecting Tools > Manage Modes brings up a dialogue box which should be configured as follows:
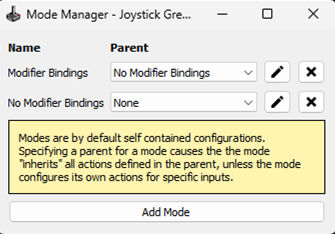
In effect, the ‘No Modifier Bindings’ mode contains the keybindings which I have associated with my Virpil Alphas which are applied when the modifier button is not pressed. The ‘Modifier Bindings’ mode contains the keybindings which I want to be applied when the modifier button is pressed.
Once these two modes have been created, each mode can be selected from the drop down box at the top right hand corner of the JG window:
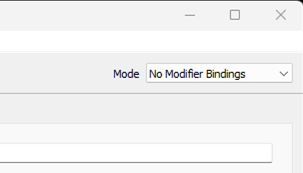
Both modes will be active when your Joystick Gremlin profile is active - switching between them using the drop down box simply allows for editing of keybindings.With the ‘No Modifier Bindings’ mode selected, Button 12 should read as you have configured it already i.e. Toggle VTOL.
When the ‘Modifier Bindings’ mode is selected there will be no bindings associated with Button 12 (or any other button or axis at this stage). To bind the ‘N’ key to Button 12, follow the same process as described in 6.1 ensuring that ‘Modifier Bindings’ mode is selected. Save the JG profile and then switch back to the ‘No Modifier Bindings’ mode.
Now we need to set up the Modifier.
My preference is to use the Left Virpil Button 30 for this function.
- Ensure the GamePad icon, at the top left of the JG application, is not active.
- Select the LEFT VPC Stick WarBRD tab.
- Select Button 30.
- In the Action Description box, type ‘Modifier’.
- Select the Temporary Mode Switch action and click Add.
- Select Modifier Bindings from the drop down mode selection.
- Select File > Save Profile.
Any other modifier associated commands can now be added to the ‘Modifier Bindings’ mode as described above for Button 12.
6.3 Mapping Actions to Hat Switches
Whilst the Power Triangle (Weapons, Shield & Engines) in Star Citizen has default keys bound to increase and decrease power to each of the three functions, there are no default keys bound to maximise each function.In order to configure Buttons 14 - 17 on my Left Virpil Alpha as follows:
- Button 14 - Reset Power Distribution.
- Button 15 - Shields Max.
- Button 16 - Engines Max.
- Button 17 - Weapons Max.
It’s necessary to map three of the four buttons to virtual buttons in vJoy Device 1. Since Reset Power Distribution is bound to F8 in the default Star Citizen keyboard profile, this can be configured in Joystick Gremlin as described in 6.1
To configure Buttons 15 - 17:
- . Ensure the GamePad icon, at the top left of the JG application, is not active.
- Select the LEFT VPC Stick WarBRD tab.
- Select Button 15 (or 16/17).
- In the Action Description box, type ‘Shield MAX’ or ‘Engines MAX’ or ‘Weapons MAX’ depending on which button you are configuring.
- Select Remap from the drop-down box under Action Description and click Add.
- Ensure vJoy Device 1 is selected in the first drop down box (you will only have a choice if you have configured more than one virtual device).
- Now select whichever of the 64 virtual buttons you wish to bind against in vJoy Device 1. In my case this is Button 15.
- Do the same for Buttons 16 and 17 and select File > Save Profile.
- Launch Star Citizen and navigate to Advanced Control Customisation under the Options menu.
- Expand Vehicles - Power Triangle Assignment and bind as follows:
- Weapons - Set to Max (Tap) > Button 17
- Engines - Set to Max (Tap) > Button 16
- Shields - Set to Max (Tap) > Button 15
6.4 Mapping Actions to Scroll Wheels
So long as the actions being associated to the scroll up and scroll down movements are binary (e.g. Increase Decoy Burst / Decrease Decoy Burst) then this is a similar process to that described in 6.1 or 6.3 depending on whether the Star Citizen default keyboard/mouse profile has a key bound to the action you wish to bind.6.5 Mapping Actions to Analog Sticks
I use two axes of movement on my Left Virpil Alpha analog stick to adjust the Speed Limiter Up/Down, and all axes of movement on my Right Virpil Alpha analog stick to adjust angle of view in Camera View (F4). Each of these actions need to be configured in slightly different ways to achieve the desired result in Joystick Gremlin.6.5.1 Analog Stick Mapping - Single Axis
On my Left Virpil Alpha the two axes of movement associated with the analog stick are X Rotation and Y Rotation. Because in this case I only wish to use Y Rotation to increase or decrease the speed limiter, the X Rotation can be ignored.- Ensure the GamePad icon, at the top left of the JG application, is not active.
- Select the LEFT VPC Stick WarBRD tab.
- Select Y Rotation.
- In the Action Description box, type ‘Speed Limiter Up/Down’.
- Select Remap from the drop-down box under Action Description and click Add.
- Ensure vJoy Device 1 is selected in the first drop down box.
- You now have a choice of selecting Dial or Slider. Neither of these virtual axes have yet been used. In my case, I chose Dial.
- Select the vJoy Device 1 tab and Dial on the left hand side (it should be at the bottom of the list).
- In the Action Description box, type ‘Speed Limiter Up/Down (ABS)’.
- Select Response Curve from the drop down box and click Add.
- Select Cubic Spline from the Curve Type dialogue box.
- Select File > Save Profile.
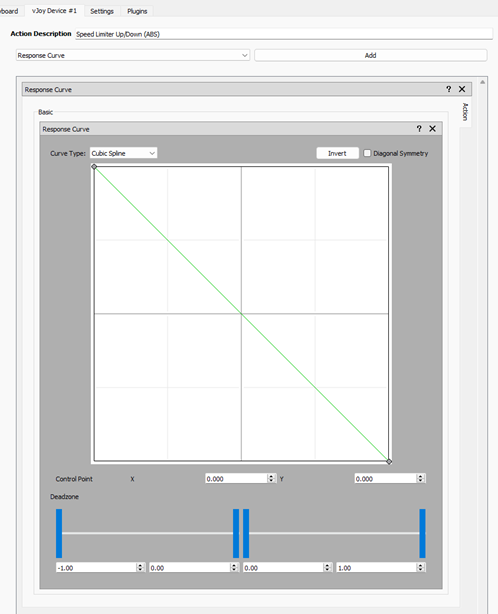
You have now created your first response curve in Joystick Gremlin and, depending on whether you prefer the analog stick UP action to increase or decrease the speed limiter, this can be configured simply by inverting the curve.
It’s important that any response curves are only added in the vJoy Device 1 tab and not in the left or right stick or sim pedal tabs.
6.5.2 Analog Stick Mapping - Multiple Axes
As previously mentioned, I use the analog stick on my Right Virpil Alpha to adjust angle of view when in Camera View (F4) (i.e. Freelook) and for this to work properly, I need it to provide seamless rotation along multiple axes.Because Star Citizen already has the Freelook function bound to the ‘Z’ key, start by binding that to Button 5 on the Right Virpil Alpha (the button press on the analog stick). This switches the Freelook function on and off.
- Ensure the GamePad icon, at the top left of the JG application, is not active.
- Select the RIGHT VPC Stick WarBRD tab.
- Select Button 5.
- In the Action Description box, type ‘Freelook’.
- Select Map to Keyboard from the drop-down box under Action Description and click Add.
- Click Record keys and hit the ‘Z’ key.
- Select X Rotation.
- Select Map to Mouse then ensure that the Motion and X Axis buttons are selected.
- It’s personal preference what you set Minimum speed and Maximum speed to, but I have mine set to 1000 and 2000 respectively. Play around with the numbers a bit, testing in game, until you find figures that you’re happy with.
- Select Y Rotation.
- Select Map to Mouse then ensure that the Motion and Y Axis buttons are selected.
- Input the same numbers as you had for the Minimum and Maximum speeds for the X Axis.
- Select File > Save Profile.
7. And That’s the Basics….
Whilst I haven’t delved too deep into Response Curves or explored some of the more in-depth functionality in Joystick Gremlin, this guide should have provided you with enough detail to get to grips with the application, establish your own semi-independent keybinding profile, and make life with multiple input devices a lot easier to live with in Star Citizen. I hope that you’ve found it useful.Please post any points for clarification, or questions in the comments section and I’ll do my best to answer them.
If you’ve found the Guide really useful and want to use my referral code, it’s STAR-PPTR-CQ5R.